To make things easier, I cut the large image in 5 rows of 8 images, with plans to work on each row and complete it before going to the next, with the expectation that maybe 6 or 7 of the tentative images would lead to a finished piece.
Starting with the first row, I began to refine the images. I was having a hard time with the last one, but the first seven came along nicely:

At this stage, I dropped the last one, and split the row in seven separate images, each image sized 8"x8"at 300ppi. I started working on the 7 panels at the same time, primed with slightly thinned Golden Absorbent Ground (White). I use a couple of coats I sand lightly to even the surface, and finisg with a last coat applied with a 1" fine sponge roller that leaves an even fine texture that catches both straight pigment and pastel flat strokes nicely. I worked on all backgrounds simultaneously, sprinkling pinches of different color pigments, rubbing them in with my fingers to a smooth finish covering part or all of each panel.
I created textures with spitting, sprinkling or spraying very diluted gum Arabic on, tamping with hand and paper towels, sprinkling on more pigments, rubbing pastels on, scribbling with pastel pencils, rubbing with fingers, spattering with tooth brushes a mixture of water, pigment, Gum Arabic and a drop of Oxgall (basically watercolor), etc...

When the basic backgrounds were done, I stated adding drawing and lettering in black and white pencil. After printing the various photographic images or groups of overlapping images (a basic trick of Trompe l'Oeil") with my Epson Archival Printer on my new very thin Matte Red River archival paper, I cut them out precisely, colored the edges with brush markers, started positioning them according to the Photoshop mockups, and moving them around to my satisfaction. At this point, no image is attached to the panels:
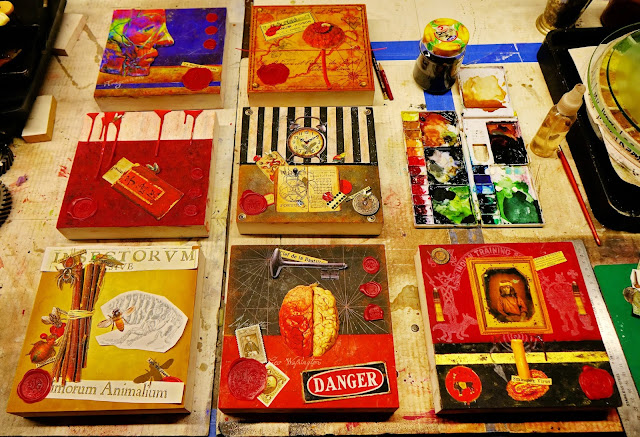
Little by little, things get tried, changed, moved, adjusted, and the images are attached to the panels with very slightly thinned Archival YES paste. The wax seals are loose, and no encaustic has been applied yet. The shadows that will create the depth and the Trompe l'Oeil effects have not even been drawn yet:

I will now let the panels sit for a few days and start working on the next row in Photoshop.

Starting with the first row, I began to refine the images. I was having a hard time with the last one, but the first seven came along nicely:

At this stage, I dropped the last one, and split the row in seven separate images, each image sized 8"x8"at 300ppi. I started working on the 7 panels at the same time, primed with slightly thinned Golden Absorbent Ground (White). I use a couple of coats I sand lightly to even the surface, and finisg with a last coat applied with a 1" fine sponge roller that leaves an even fine texture that catches both straight pigment and pastel flat strokes nicely. I worked on all backgrounds simultaneously, sprinkling pinches of different color pigments, rubbing them in with my fingers to a smooth finish covering part or all of each panel.
I created textures with spitting, sprinkling or spraying very diluted gum Arabic on, tamping with hand and paper towels, sprinkling on more pigments, rubbing pastels on, scribbling with pastel pencils, rubbing with fingers, spattering with tooth brushes a mixture of water, pigment, Gum Arabic and a drop of Oxgall (basically watercolor), etc...

When the basic backgrounds were done, I stated adding drawing and lettering in black and white pencil. After printing the various photographic images or groups of overlapping images (a basic trick of Trompe l'Oeil") with my Epson Archival Printer on my new very thin Matte Red River archival paper, I cut them out precisely, colored the edges with brush markers, started positioning them according to the Photoshop mockups, and moving them around to my satisfaction. At this point, no image is attached to the panels:

Little by little, things get tried, changed, moved, adjusted, and the images are attached to the panels with very slightly thinned Archival YES paste. The wax seals are loose, and no encaustic has been applied yet. The shadows that will create the depth and the Trompe l'Oeil effects have not even been drawn yet:


No comments:
Post a Comment