Practice is fun enough, and I obviously need a lot more of it before I have tried all the available techniques techniques, and figure out which to use for a particular painting, and in what order. There is a certain amount of unpredictability built in the medium, and one often have to go with the flow, exploit an accident, and end up with something different from what they intended.
That works well for abstract work, but I am planning to do semi realistic Photo Encaustics from mockups designed in Photoshop, so I need a certain amount of control. I will probably have to do a small experimental panel for each larger piece to determine the best way to proceed in order to achieve a particular color and texture.
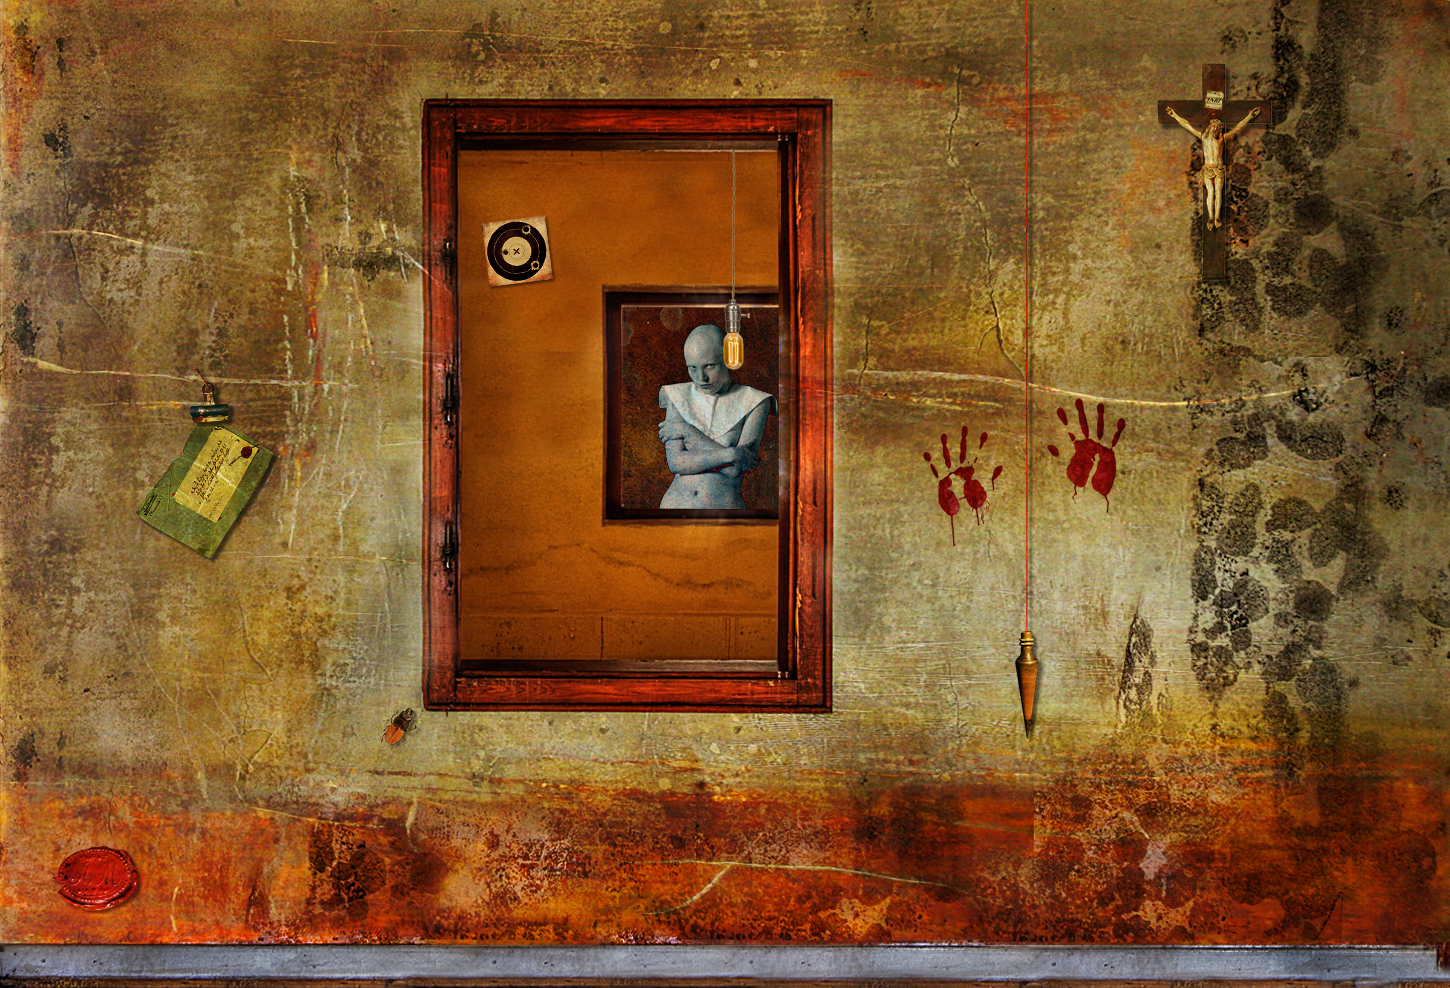
And this is what is at hand today. I want my first big "serious" 48"x72" painting to be "Trompe l'Oeil Window":


That works well for abstract work, but I am planning to do semi realistic Photo Encaustics from mockups designed in Photoshop, so I need a certain amount of control. I will probably have to do a small experimental panel for each larger piece to determine the best way to proceed in order to achieve a particular color and texture.
And this is what is at hand today. I want my first big "serious" 48"x72" painting to be "Trompe l'Oeil Window":
I have just begun a small panel that will be a test, and hopefully guide me to achieve something close, and as good or better than the Mockup. It doesn't look too bad for a start, with just pigments rubbed in the paper, and a couple of layers of fused medium:

The final Piece will definitely be different, since I have lost the total control of Oil Painting. But then, the various textures I layered and manipulated in Photoshop are just that,textures, and I have no need to match them exactly, as long as the wall comes out looking like an old grimy wall.
I put together a group of images on a 8"x10" background to use for testing, including the letter, the crucifix, and the plumb line, all with drop shadows:

I printed it as a baseline test on my familiar Epson Ultra Premium Presentation Paper Matte. It looked great. I then cut and taped a piece of Japanese Calligraphy Sumi paper to sheet a plain paper, so it wouldn't get jammed and torn in the printer, and printed the same image on the glossy side of the Sumi paper. I was quite amazed at how well it came out. Granted, there is a little less contrast and saturation, but that could easily be compensated for with a curve. I photographed them side by side:

My original intention was to use the Japanese paper because it is so thin it literally disappear into the wax. But in the process, it becomes transparent, and the background will show through the very light areas where there is little ink. That was not a problem with the stylized Solarized Inverted mostly black nude image, but it will be with these. If I want the images to look real enough for a Trompe l'Oeil effect, I will have to print them on a paper that doesn't become transparent at all. I will have to test the Epson Matte for that.
The images will have to be perfectly cut out, but I am afraid a hard edge drop shadow might look unrealistic. I may have to paint them with oils.
Also, the images obviously will have to go on last, and be literally embedded in fairly soft wax with a brayer, before they are barely covered by a thin layer of highly buffed very transparent medium. Evans Encaustic offers a High Shine Top Coat that might be appropriate.
That means that all the wall texture, encaustic and oil work will need to be done first.
I cut out all the images, using scissors, x-Acto knives, and small snap blade cutters. Scissors produce the smoother curves and the thinest edge. Cutters are the worst, raising a sort of burr that has to be burnished. The thinner X-Acto blade is somewhere in between.
When placed on a light ochre panel and rubbed on the wax, the Sumi prints look definitely darker and duller than the Epson Matte paper, but show more texture, and are less"in your face". Of course, the Epson prints could be made darker:

I placed the two side by side on the WALL TEST 1 PANEL, and can't really decide which I like best:

So I made a second almost identical Test Panel on a piece of Masonite primed with two coats of Golden Absorbent Ground, rubbing yellow ochre, red ochre, and black pigments on with my fingers:

The texture is very different from paper, as the brush marks are quite sharp, even though I used a very soft big goat hair brush, so the result is rather different, but not so much once it is covered with two coats of clear medium and buffed:

Well, now is the real test, one panel with the Sumi Prints, the other with the Epson Prints, after doing some texture work scraping, scribbling, adding colored medium, rubbing oil in pits and scratches, sprinkling and rubbing dry pigments into the wax, and fusing multiple times.
No comments:
Post a Comment